Exporting to Excel
Find the Display in the Displays pane. If there are many Displays, the Display tab of the Display might not be immediately visible. In that case, click
 to see the list of available Displays and find your Display there.
In the Action bar, click
 . The Export to Excel dialog box opens.
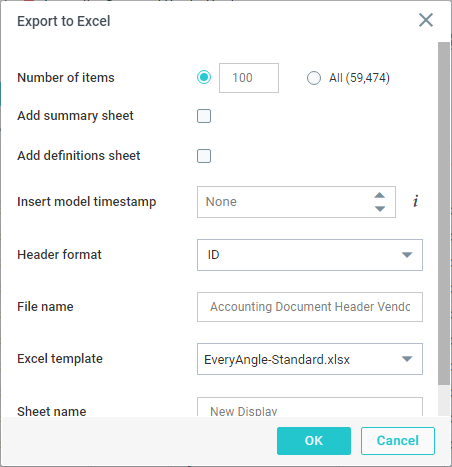
Enter the following fields:
Number of items - Specify the number of rows you want to export, or select all rows. You can change the default number of rows shown here in the Settings pane. See Setting the export options. This field is only available for Lists.
Add summary sheet - Check this box to add the Angle definition to the Excel file, in a separate Summary sheet.
Add definitions sheet - Check this box to add the help texts to the Excel file, in a separate Definition sheet.
Insert model timestamp - If you want the model timestamp to be included, you can specify here in which column it should be inserted. 1 represents the first column. If no model timestamp column is required, select None.
Header format - Select whether you want to include the ID, the short name, or the long name in the column headers of the Excel file. If you have defined an alternative name for a field, the alternative name will be shown in the Excel. Select the ID when the data is to be used in other tools for further processing. This field is only available for Lists.
File name - Specify the name for the Excel file. The Angle name is shown by default.
Excel template - Select the Excel template that should be used for the export from the drop-down list. By default, the template that is mentioned in the Display details of the Display that you are exporting is used (see Setting the default Excel template for a Display). You can override this default by choosing a different template.
You can also select a Process Automation Pack template here. Process Automation Pack templates are indicated by the
 icon. The included and related SAP processes are displayed under the drop-down list.
Sheet name - Specify the name for the Excel sheet. The Display name is shown by default.
Click OK to start the export. By default, the Excel file will be saved in your Downloads folder.
Note
The Export to Excel functionality only operates fully if you have Excel installed on the device you are using.
Note
If you have selected the bucket "Per day" for a DateTime field, only the date is written to that field in the Excel file. See Editing a Display.